Run dotCMS on Docker, on AWS, or compile the source from GitHub.
Evaluating dotCMS for enterprise? Request a free 30-day enterprise trial license.
The latest Current and LTS releases are available as supported docker images. Click to copy the Docker image tag.
Release Type | Version | Docker Image |
---|---|---|
Current Release | 24.11.11 |
dotcms/dotcms:24.11.11_65c8ebb |
LTS Release | 24.04.24v11 |
dotcms/dotcms:24.04.24_lts_v11_4999f58 |
LTS Release | 23.10.24v19 |
dotcms/dotcms:23.10.24_lts_v19_148f2c4 |
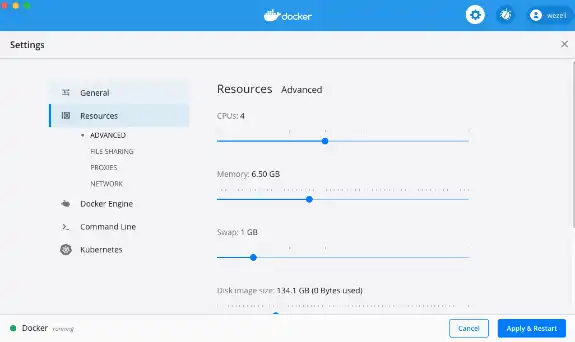
Running dotCMS in Docker is the simplest way to get started with dotCMS on any platform. In order to run dotCMS successfully, we recommend having at least 2 CPUS and at least 6GB RAM assigned to your docker environment.
Run the command below if you want to start dotCMS with demo content and data. The docker compose file that is run is downloaded directly from our github examples repo. It includes all the content/data from our demo site.
curl -o docker-compose.yml https://dotcms.com/run/demo && docker-compose up
If you want to start fresh, you can also start up a clean installation with no data. Again, this comes from our github examples repo.
curl -o docker-compose.yml https://dotcms.com/run/clean && docker-compose up
Once your dotCMS is up and running, you can connect to it by going to https://local.dotcms.site:8443.
To sign in to the administrative console, go to
https://local.dotcms.site:8443/dotAdmin
and use the following credentials:
admin@dotcms.com / admin
(Note: You can also use https://localhost:8443; just accept any certificate warning.)
This example shows how to install dotCMS on Amazon's Linux 2 via docker. There are many ways to configure dotCMS in docker - for a list of options that can be applied to our docker images see our documentation site.
Make sure your server has appropriate memory and disk space. We recommend a minimum of 7.5GB of memory and 50GB of disk space.
For more information on dotCMS memory usage, see the Memory Configuration documentation.
Place the box in a Security Zone that allows for access to port 22, 80 and 443
ssh -i ~/keys/your-key.pem ec2-user@{servers.amazon.public.ip}
Cut and paste these commands into your ssh terminal. These commands will download and install docker, set up a dotcms user and fire up an example dotCMS installation.
sudo yum update -y
sudo yum install docker git -y
## set elasticsearch virtual memory settings
## Elasticsearch will not start up without this
sudo sysctl -w vm.max_map_count=262144
sudo sysctl -w fs.file-max=100000
## make sure they stick
sudo sh -c "echo 'vm.max_map_count=262144' >> /etc/sysctl.conf"
sudo sh -c "echo 'fs.file-max=100000' >> /etc/sysctl.conf"
sudo sysctl -p
## edit docker file limits
sudo sh -c "echo \"OPTIONS='--default-ulimit nofile=65536:65536'\" >> /etc/sysconfig/docker"
## Start docker
sudo service docker start
## install docker-compose
sudo curl -L "https://github.com/docker/compose/releases/download/1.24.0/docker-compose-$(uname -s)-$(uname -m)" -o /usr/local/bin/docker-compose
## set exec perms
sudo chmod +x /usr/local/bin/docker-compose
## Symlink it to your path
sudo ln -s /usr/local/bin/docker-compose /usr/bin/docker-compose
## test that it works
docker-compose --version
## dotCMS docker image runs with uid 1000000000
sudo useradd -u 1000000000 -U -G docker -d /data dotcms
## make data readable
sudo chmod -R 755 /data
## Change to dotcms user
sudo su dotcms -
## mk installation directory
mkdir /data/dotcms && cd /data/dotcms
## copy one of the example docker-compose templates
wget https://raw.githubusercontent.com/dotCMS/core/master/docker/docker-compose-examples/single-node-demo-site/docker-compose.yml
## fire it up!
docker-compose up -d && docker-compose logs -f
It is easy to roll your own custom dotCMS build. Our open source code is on GitHub and can be downloaded, modified and reused as needed.
The first step is to ensure all requisite utilities for the build procedure are installed. Ensure you have Docker, Git, Just, and Chromium installed.
We recommend using a package manager, such as Homebrew on a Mac. This can make installing components as easy as:
brew install just
brew install --cask chromium
Finally, perform the following commands:
export PUPPETEER_SKIP_CHROMIUM_DOWNLOAD=true
export PUPPETEER_EXECUTABLE_PATH=`which chromium`
(Note that this step in particular will be changing in the near future as we simplify our build scripts.)
Run the following command to clone the repository to an empty directory.
git clone https://github.com/dotCMS/core.git
Once you have cloned dotCMS, you can `git checkout` the branch you want to compile. In this case, we will compile the `master` branch. dotCMS uses Maven as our build tool, but its commands are accessed via Just. You need to be in the `core` directory to use it:
cd core
just install-all-mac-deps
just build
Note that the install-all-mac-deps command only needs to be run once; subsequent builds can proceed with just build alone.
Once the build completes, you can immediately deploy dotCMS with the following command:
just dev-start-on-port 8082
From there, visit http://localhost:8082/admin to log in.
When you wish to undeploy, use the following:
just dev-stop