In order for dotCMS Permissions to be respected, users and applications should be authenticated in dotCMS before calling any of the REST endpoints. Some content may still be accessible through the REST API for unauthenticated users (depending on your content permissions), but you can configure dotCMS to limit access or otherwise require greater security for REST API authentication.
Overview
- The content returned by all REST API calls always respects dotCMS permissions.
- To access content with restricted permissions, or REST API endpoints, the user or application must be authenticated.
- There are a number of different authentication methods you can use with the REST API.
- If any REST endpoints are called without authentication, the permissions for the call will be those assigned to the CMS Anonymous user.
- Some REST endpoints require authentication and others do not.
- The REST API Endpoints documentation specifies whether authentication is required for each endpoint (regardless of configuration settings).
- Endpoints that require authentication will fail (status code 401) if a user is not authenticated, even if the user is attempting to access content which the CMS Anonymous user has full permissions to access.
- Endpoints that do not require authentication provide access to all content which is visible from the front-end of your site (and any other content which is visible to the CMS Anonymous user).
- You may change the dotCMS configuration to prevent unauthenticated access to these REST API endpoints.
- For more information, please see Restricting Access, below.
- The REST API may be configured to improve security and limit access to the REST API in several different ways.
- For more information, please see Restricting Access, below.
Overview of Application Security Best Practices
When a user has an application that accesses dotCMS using an API token, it's recommended as best practice to:
- Create a separate user account for the application to use, rather than using an existing user account.
- The account should be created as a front-end user.
- Create a separate Role for the application to use, which explicitly defines just the minimum rights the application needs.
This ensures the following:
- The application token cannot ever be used to sign in to the dotCMS back-end administrative interface.
- Changes to an actual user or role — such as deactivating the account of a user that left or changed positions, or adjusting user role rights — won't affect the application permissions.
- The application receives only the minimum rights it needs.
Example: Read-Only Token
To illustrate this process using an account with front-end access only, the following steps will create a token with an effective “read-only” access level.
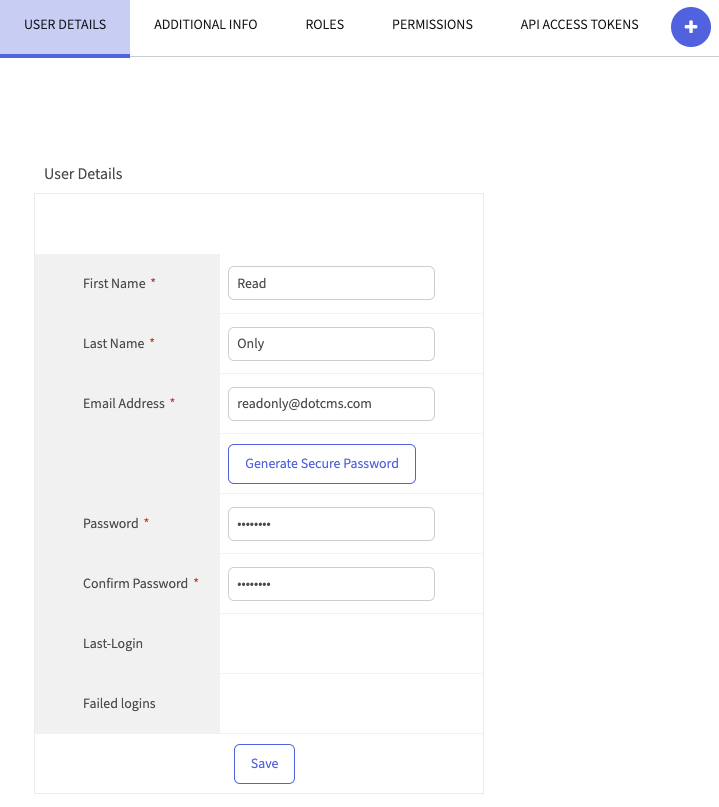
- Start by creating a new user under System -> Users:
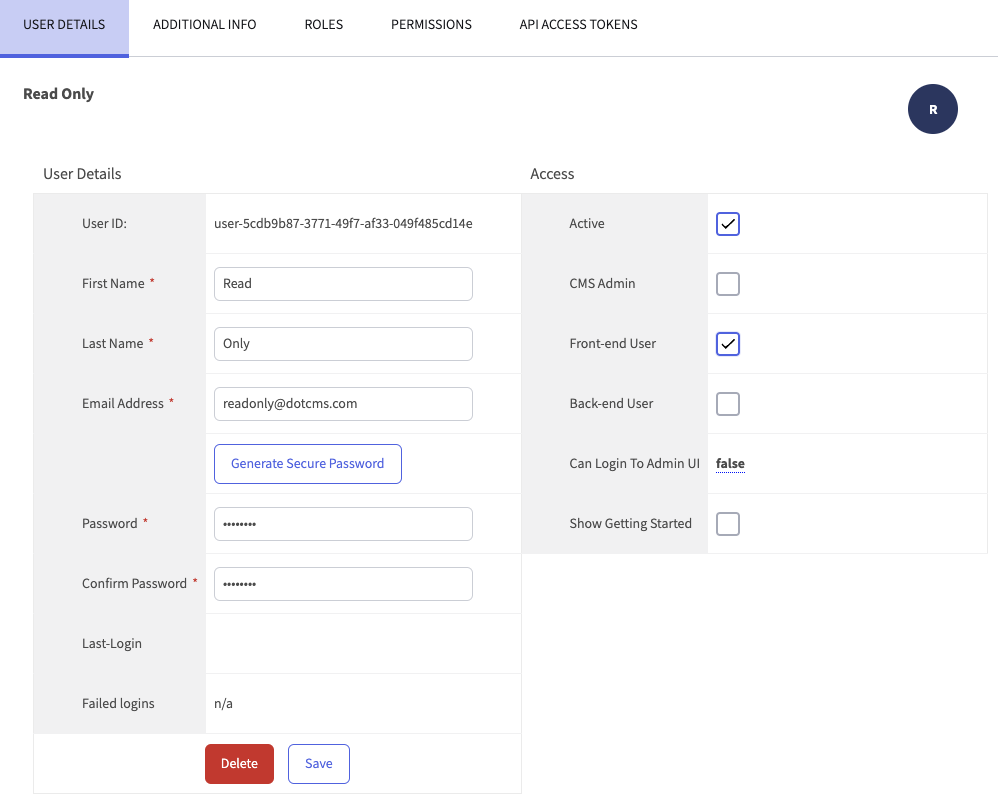
- Click in the new user and activate the Front-end User checkbox:
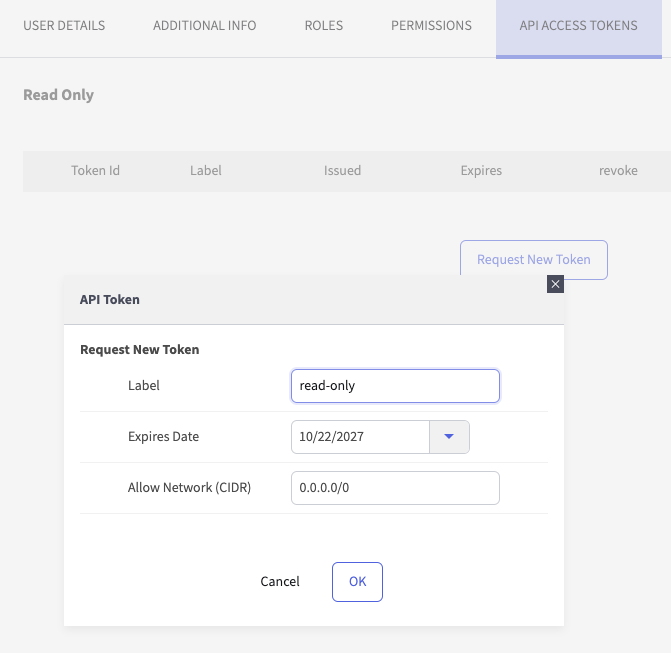
- Click the API Access Tokens tab for this user and create a new token:
API Token Authentication
When using the dotCMS APIs, we recommend that you use API tokens to authenticate your API calls. It is possible to generate an API token programatically, using the API or through the UI.
Note: The use of API Tokens enables fully automated use of the REST API. For security purposes, only administrators can create API Tokens. Individual users can not create API Tokens for their own accounts unless those users have been assigned the CMS Administrator Role.
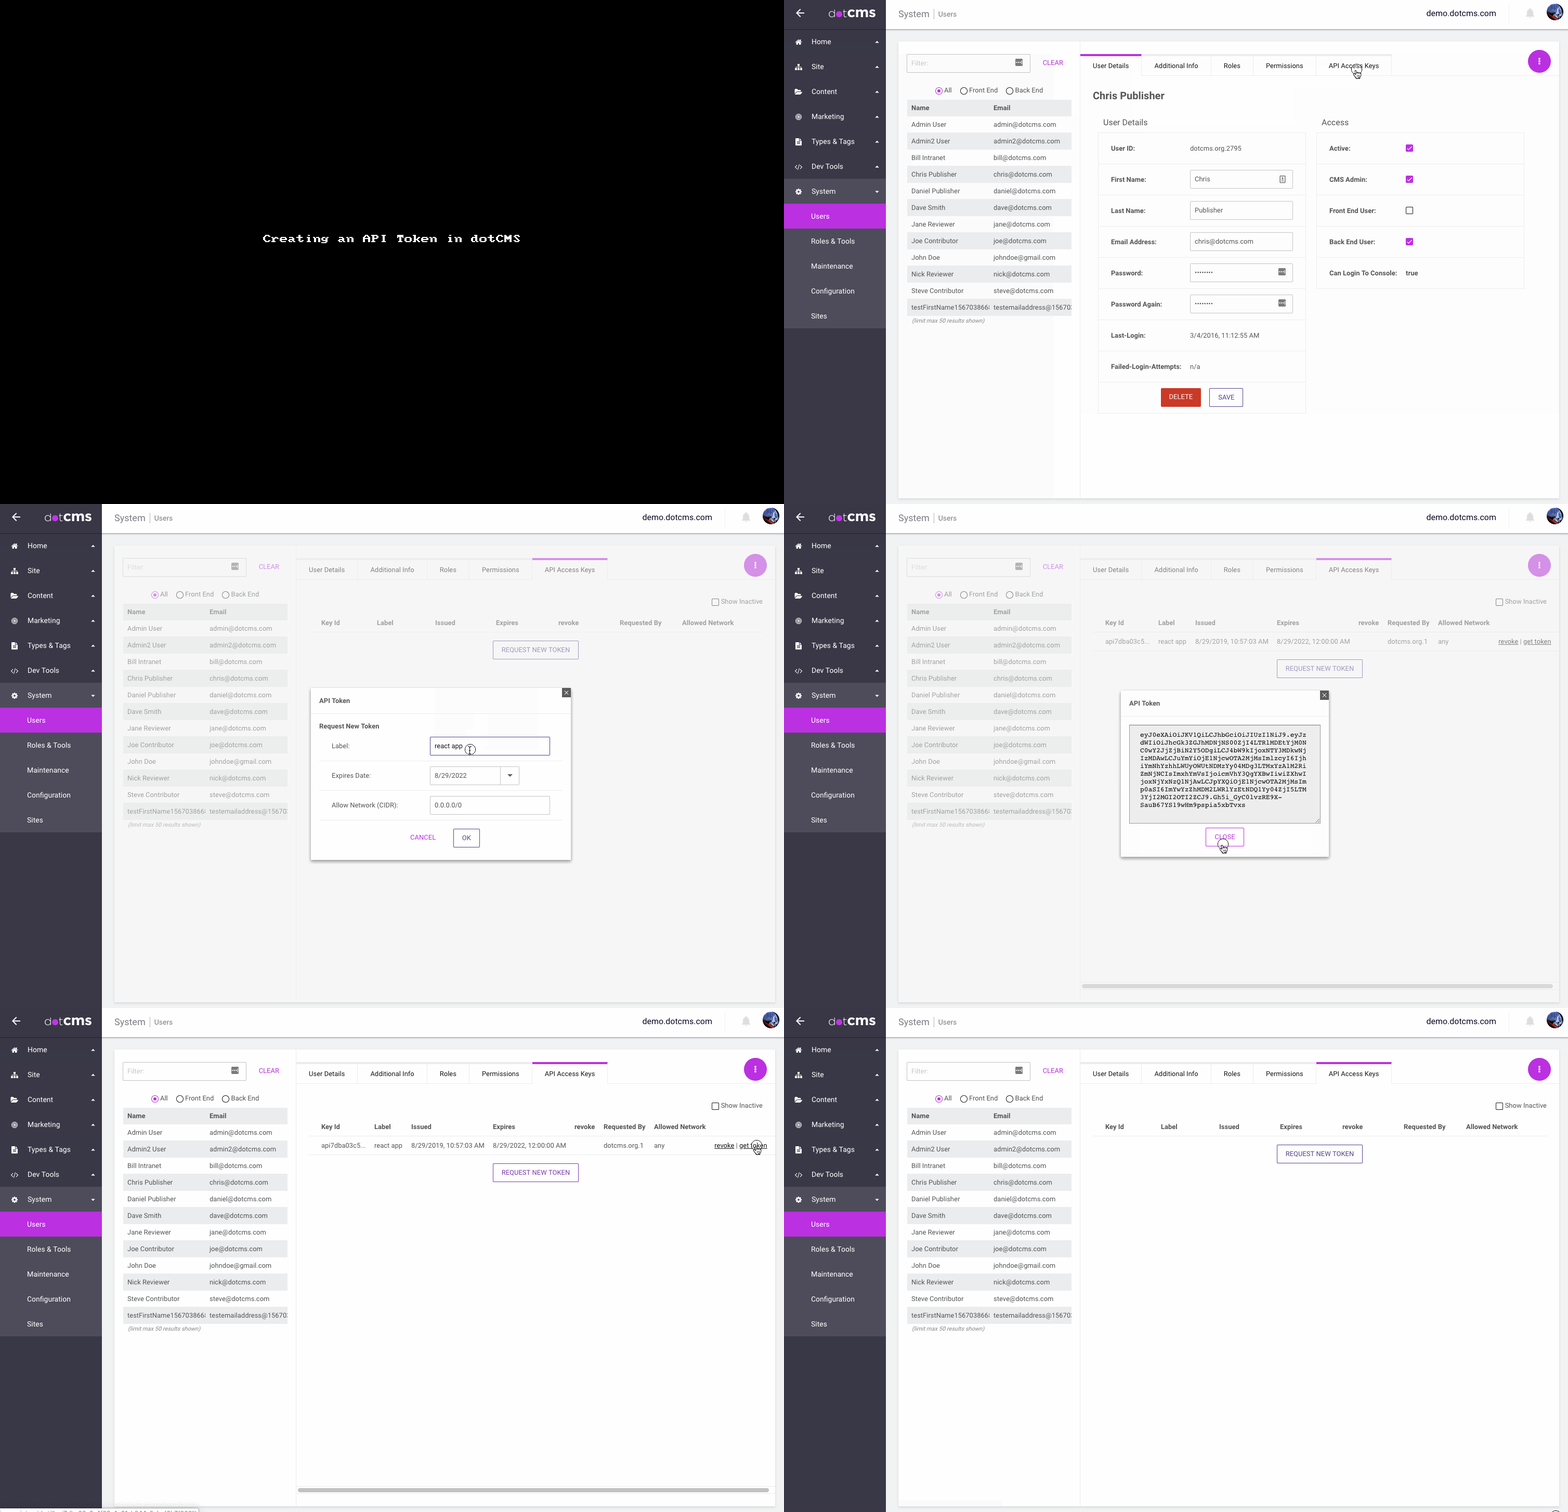
Creating an API Token in the UI
From the UI, tokens can be generated from the User manager portlet. In the User manager, select the user for whom to create the token - all API accesses by the token will use the permissions of the user for which it was created. Second, click the tab entitled “API Access Tokens”. From there, click the button “Request a new Token”. Enter a descriptive title, an expiration data and a network (CIDR notation) from which the token can be used and click “OK”. A window will display the token to you.
Creating an API Token via API
The following curl commands demonstrate how to use JSON Web Tokens (JWT) to authenticate REST API calls. Note: Always use SSL/HTTPS.
Step 1: Requesting the Token
The following curl command accesses the /api/v1/authentication/api-token REST API endpoint to request a token based on the supplied user name and password:
curl -H "Content-Type:application/json"  -X POST -d  '
{ "user":"admin@dotcms.com", "password":"admin", "expirationDays": 10 }
' https://demo.dotcms.com/api/v1/authentication/api-token
The call returns the following JSON result, containing the token:
{"errors":[],"entity":{"token":"eyJhbGciOiJIUzI1NiJ9.eyJqdGkiOiJpWEtweXU2QmtzcWI0MHZNa3VSUVF3PT0iLCJpYXQiOjE1MTY2NDM4OTAsInN1YiI6IntcInVzZXJJZFwiOlwiaVhLcHl1NkJrc3FiNDB2TWt1UlFRd1xcdTAwM2RcXHUwMDNkXCIsXCJsYXN0TW9kaWZpZWRcIjoxMjA0ODI0OTYxMDAwLFwiY29tcGFueUlkXCI6XCJkb3RjbXMub3JnXCJ9IiwiaXNzIjoiaVhLcHl1NkJrc3FiNDB2TWt1UlFRdz09IiwiZXhwIjoxNTE3NTA3ODkwfQ.KG0dDXgJdZDA6Bd77bTQjH1iKw_LY-AixN4dALAnRgQ"},"messages":[],"i18nMessagesMap":{}}
Step 2: Providing the Token with Subsequent Requests
The following curl command supplies the previously retrieved token to authenticate a call to a different REST API endpoint (/api/v1/users/current):
curl -H "Authorization:Bearer eyJhbGciOiJIUzI1NiJ9.eyJqdGkiOiJpWEtweXU2QmtzcWI0MHZNa3VSUVF3PT0iLCJpYXQiOjE1MTY2NDM4OTAsInN1YiI6IntcInVzZXJJZFwiOlwiaVhLcHl1NkJrc3FiNDB2TWt1UlFRd1xcdTAwM2RcXHUwMDNkXCIsXCJsYXN0TW9kaWZpZWRcIjoxMjA0ODI0OTYxMDAwLFwiY29tcGFueUlkXCI6XCJkb3RjbXMub3JnXCJ9IiwiaXNzIjoiaVhLcHl1NkJrc3FiNDB2TWt1UlFRdz09IiwiZXhwIjoxNTE3NTA3ODkwfQ.KG0dDXgJdZDA6Bd77bTQjH1iKw_LY-AixN4dALAnRgQ" \
-X GET  https://demo.dotcms.com/api/v1/users/current
This call returns the following JSON result, demonstrating that the authentication succeeded:
{"userId":"dotcms.org.1","givenName":"Admin","email":"admin@dotcms.com","surname":"User","roleId":"e7d4e34e-5127-45fc-8123-d48b62d510e3"}
Other Authentication Methods
dotCMS also supports the following authentication methods. Note that these methods are checked in the order shown below, so if multiple authentication methods are provided (for example if a user is logged into the dotCMS back-end, but also supplied a Basic authentication header), the user used to authenticate the REST API call will be the one with the lowest Order (the one that is listed first) in the following list:
| Order | Authentication Method | Persistence | Security Level |
|---|---|---|---|
| 1 | URL Parameters | Stateless | Insecure |
| 2 | DOTAUTH Header | Stateless | With HTTP: Insecure With HTTPS: Limited |
| 3 | Basic Authentication | Stateless | With HTTP: Insecure With HTTPS: Limited |
| 4 | JWT (Token) | Stateless* | Secure |
| 5 | Back‑end Login | Session | Secure |
| 6 | Front‑end Login | Session | Secure |
- = Note that the dotCMS back-end stores the token used for JWT in a cookie; however when implementing your own application you do not need to use a cookie.
Persistence
There are three types of persistence for authentication: Cookie, Stateless, and Session.
| Persistence Type | Description |
|---|---|
| Cookie | The user information is stored in a token which is signed, encrypted, and stored in a Cookie. |
| Session | Once the user logs in, the user identification is contained in the session.
|
| Stateless | Login information is passed with each request.
|
Secure Authentication
The following methods are the recommended methods for REST API authentication. It is strongly recommended that one of these methods be used to access any public-facing site, or any site not on a tightly controlled internal network.
| Method | Description |
|---|---|
| Front‑end Login | Once a user has logged into dotCMS, the user is identified and authenticated via their session. |
| Back‑end Login | Once a user has logged into dotCMS, the user is identified and authenticated via their session. |
| JWT/API Token | JWT uses a token (stored in a cookie) which stores the signed and encrypted user login information and sends it to the server to identify the user. |
Limited Security Authentication
The following methods can be used for a limited level of security, but only when the HTTPS protocol is used.
Important
If these authentication methods are used with the HTTP protocol they are completely insecure (with user name and password sent without any encryption).
- Therefore these should only be used if dotCMS is configured to force HTTPS access, and even then they are not as secure as the secure authentication methods shown above.
If you use these methods, it is recommended that you configure dotCMS to either:
| Method | Description |
|---|---|
| Basic Authentication | Set the AUTHENTICATION header in your HTTP request, with the user name and password base64 encoded. |
| DOTAUTH Header | Set the DOTAUTH header in your HTTP request, with the user name and password base64 encoded.Example: setHeader("DOTAUTH", base64.encode("admin@dotcms.com:admin")) |
| URI Parameters | Add /user and /password parameters to the URI.Example: /user/xxx/password/yyy |
Note:
- Even when using HTTPS, with all of these methods the login credentials are usually stored in the server access logs (since they are passed in the GET, which is usually stored in the logs). Therefore, if any of these methods are used, it is highly recommended that either:
- Access to the server logs is highly restricted, OR
- The server is configured to not store the GET headers in the access logs (and one of the header authentication methods is used instead of passing credentials in the URI).
- If you want or need to use one of these authentication methods instead of one of the secure authentication methods listed above, it is recommended that you use the DOTAUTH header.
- This may be considered slightly more secure than Basic authentication, since it's a non-standard header and is thus less likely to be identified by standard malware or sniffers (which have not been designed to explicitly target the dotCMS software).
- Base64 encoding does not encrypt the user name and password.
- It is trivial to decode the base64 version of the user name and password, unless some form of encryption is used (such as HTTPS).
Retrieving Unpublished Content
To read unpublished content, the user needs to have the “Back End User” permission/Role assigned. As a security precaution, front-end users are never allowed to see unpublished content. In addition, to retrieve any unpublished content using any API, you must be an authenticated user. Unpublished content is never visible to anonymous users due to security precation.
Restricting Access
You may change the default behavior to provide greater access restrictions to the REST API than the default dotCMS behavior. The following properties in the dotmarketing-config.properties file can be changed to modify the authorization requirements when accessing the REST API:
| Properties | Default Value | Description |
|---|---|---|
FORCE_SSL_ON_REST_API | false | If set to true, all REST endpoints must be accessed using SSL/HTTPS. |
REST_API_FORCE_FRONT_END_SESSION_AUTH | false | If set to true, will prevent REST access by dotCMS back-end logins. Note: When this is set the REST API will still accept authentication via other methods, including headers, basic auth, and front-end logins. |
REST_API_CONTENT_ALLOW_FRONT_END_SAVING | false | Must be set to true to allow users to submit content using a REST API form on your front-end site. For more information, please see the Save Content Using the REST API documentation. |
Restricting Access by Unauthenticated Users
In addition to the above settings, which apply to all users for all REST APIs, you may provide additional restrictions to what APIs unauthenticated may access, with the following parameters:
| Properties | Default Value | Description |
|---|---|---|
REST_API_REJECT_WITH_NO_USER | false | If set to true, prevents access to all REST endpoints for non-authenticated users (regardless of content permissions, and regardless of the “Login Required” value in the REST API Endpoints documentation). Note: Users may be authenticated using any method, including headers, basic auth, JWT, front-end logins or back-end logins. |
CONTENT_APIS_ALLOW_ANONYMOUS | READ | May be set to any of the following values:
|
These properties must be set in addition to other REST API access properties. Therefore, for unauthenticated users to access content using the REST API, all of the following must be true:
- The
REST_API_CONTENT_ALLOW_FRONT_END_SAVINGproperty must be set totrue. - The
REST_API_REJECT_WITH_NO_USERproperty must be set tofalse. - The
CONTENT_APIS_ALLOW_ANONYMOUSproperty must be set to appropriate permissions for the operation to be performed (e.g.readorwrite). - The content Permissions must grant the
CMS Anonymoususer appropriate permissions for the operation to be performed.


